
FOOD
Discover the WonderDays Make Your Own Charcuterie Course
In recent years, the art of charcuterie has evolved from a culinary trend into a sophisticated and enjoyable experience for food enthusiasts. The “WonderDays: Make Your Own Charcuterie Course” offers a unique opportunity for individuals and groups to dive into this culinary craft. This course not only provides hands-on experience but also imparts valuable skills and knowledge about creating beautiful and delicious charcuterie boards. In this comprehensive guide, we’ll explore what makes the WonderDays charcuterie course stand out, what participants can expect, and why this experience is becoming increasingly popular.
What is Charcuterie?
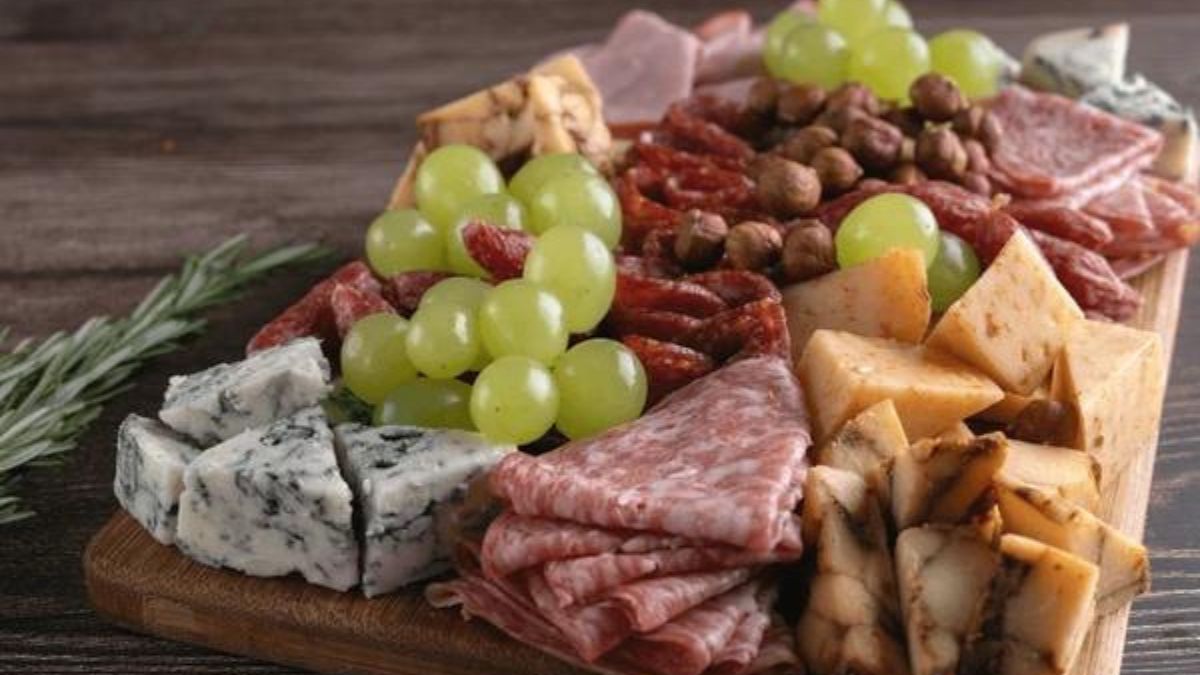
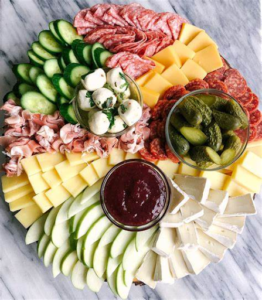
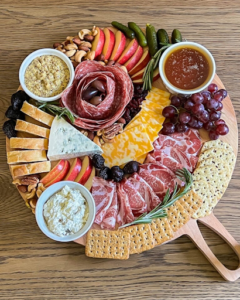
Before diving into the specifics of the WonderDays course, it’s essential to understand what charcuterie is. Charcuterie, a French term that translates to “cooked flesh,” traditionally refers to the preparation of cured meats. Today, however, it encompasses a broader range of items including cheeses, fruits, nuts, and condiments. The goal is to create a visually appealing and delectable assortment of foods that can be enjoyed as a snack, appetizer, or even a full meal.
The Appeal of the WonderDays Charcuterie Course
Hands-On Learning Experience
One of the primary attractions of the WonderDays course is the hands-on learning experience. Unlike many culinary classes that focus solely on demonstration, this course emphasizes active participation. Attendees are guided through the process of selecting ingredients, arranging them on a board, and creating a balanced and visually appealing spread. This interactive approach ensures that participants not only learn but also apply their newfound skills immediately.
Expert Guidance
The course is led by experienced instructors who are passionate about charcuterie. These experts provide valuable insights into the art of pairing different types of meats, cheeses, and accompaniments. They also offer tips on presentation techniques, ensuring that each charcuterie board is both aesthetically pleasing and delicious. Participants benefit from the instructors’ expertise, gaining a deeper understanding of the nuances involved in creating a perfect charcuterie board.
Customization and Creativity
Participants in the WonderDays course are encouraged to unleash their creativity. The course offers a variety of ingredients, allowing individuals to customize their charcuterie boards according to their personal preferences. Whether it’s selecting unique cheeses, experimenting with different types of cured meats, or adding an array of fresh fruits and nuts, the course provides ample opportunities for creative expression.
What to Expect from the Course
Course Structure
The WonderDays charcuterie course typically follows a structured format designed to maximize learning and enjoyment. Here’s a breakdown of what participants can expect:
- Introduction to Charcuterie: The course begins with an overview of charcuterie, including its history, types of products, and key components.
- Ingredient Selection: Participants are introduced to various types of cheeses, meats, and accompaniments. They learn about flavor profiles, textures, and how to select complementary ingredients.
- Board Assembly: Guided by the instructors, participants begin assembling their charcuterie boards. This stage focuses on arrangement techniques, balancing flavors, and creating visual appeal.
- Presentation and Tasting: Once the boards are assembled, participants get the chance to present their creations. This is followed by a tasting session where everyone can enjoy their boards and share feedback.
- Tips and Tricks: The course concludes with additional tips on preserving and storing charcuterie, as well as advice on how to recreate the experience at home.
Duration and Location
The duration Gather the Girls Wellness Spa Day With Treatment of the WonderDays charcuterie course can vary, typically ranging from a few hours to a full day. The course is offered at various locations, including culinary schools, specialized venues, and even private settings. It’s advisable to check with WonderDays for specific details on locations and schedules.
What to Bring
Participants are usually provided with all the necessary ingredients and equipment. However, it’s a good idea to wear comfortable clothing and bring an apron if you prefer. Some courses may also provide materials for note-taking, so a pen and notebook could be useful.
Benefits of the Course
Culinary Skills Enhancement
One of the significant benefits of the WonderDays charcuterie course is the enhancement of culinary skills. Participants learn about different types of meats, cheeses, and accompaniments, gaining knowledge that extends beyond the course. These skills can be applied to various culinary endeavors, making it a valuable experience for home cooks and aspiring chefs alike.
Social Experience
The course also serves as a fantastic social experience. Whether attended with friends, family, or as a solo activity, participants have the opportunity to interact with others who share an interest in food. The collaborative environment fosters social connections and adds an element of fun to the learning process.
Creative Expression
Charcuterie boards are a canvas for creativity. The course encourages participants to experiment with different combinations of ingredients and presentation styles. This creative freedom allows individuals to express their personalities and preferences through their charcuterie boards.
Popular Questions and Answers
How long does the course last?
The duration of the course can vary depending on the location and format. Typically, it lasts between 2 to 4 hours, but some extended workshops may take a full day.
Do I need any prior experience in cooking?
No prior experience is required. The course is designed to accommodate participants of all skill levels, from beginners to experienced cooks.
What ingredients are provided?
Participants are usually provided with a variety of cheeses, cured meats, fruits, nuts, and condiments. The exact selection may vary, but there is generally a wide range of options to choose from.
Can I attend the course alone?
Absolutely. Many participants attend solo, and the course is a great way to meet new people who share a passion for food.
How do I book a spot in the course?
Bookings can typically be made through the WonderDays website or by contacting their customer service.

Introduction to mcdfoofforthoughts.com
If you’re on the lookout for a blog that goes beyond the ordinary, mcdfoofforthoughts.com should be on your radar. This platform is not just another addition to your reading list; it’s an invitation into a world of diverse ideas and insights. The blend of thoughtful writing and engaging topics makes it a standout resource in today’s digital landscape. Whether you’re seeking inspiration or simply want to expand your horizons, this blog has something valuable to offer every reader. Let’s dive deeper into what makes mcdfoofforthoughts.com so special and why it deserves your attention.
The Unique Perspective of the Writer
The writer of mcdfoofforthoughts.com brings a refreshing viewpoint that sets the blog apart. Their background and experiences shape every article, infusing it with authenticity.
Readers can expect a blend of personal anecdotes and insightful analysis. This unique mixture creates a relatable yet thought-provoking reading experience.
Every post reflects deep introspection and genuine curiosity about the world. The writer’s ability to connect seemingly unrelated ideas invites readers to think differently.
Moreover, their willingness to tackle complex subjects while maintaining clarity is commendable. It encourages engagement rather than alienation, making difficult topics more accessible.
This distinctive lens fosters an environment where discussions flourish. Readers find themselves not just consuming content but participating in meaningful conversations that resonate on multiple levels.
Engaging and Thought-Provoking Content
At mcdfoofforthoughts.com, content is crafted to ignite curiosity. Each post invites readers to explore new ideas and perspectives that challenge the norm.
The depth of analysis sets this blog apart. Topics are dissected with care, provoking thoughtful discussions among the audience. You’re not just consuming information; you’re engaging in a dialogue with the writer’s insights.
Whether it’s an exploration of societal trends or personal reflections, there’s always something that resonates. The posts encourage you to reflect on your own beliefs and experiences.
Visiting this blog can feel like a refreshing intellectual exercise. It sparks inspiration and motivates deeper thinking about everyday life and complex issues alike.
Every article serves as a catalyst for conversation, urging readers to share their thoughts while fostering an atmosphere rich in diverse viewpoints.
Variety of Topics Covered
At mcdfoofforthoughts.com, variety is the spice of life. The blog dives into a myriad of subjects that cater to diverse interests.
From personal development to pop culture, every post invites readers on a new journey. There’s always something fresh and intriguing waiting for you.
The writer explores thought-provoking themes like mental health and societal issues. Each piece encourages reflection and discussion.
Book lovers will find engaging reviews alongside recommendations across genres. Whether you’re into fiction or non-fiction, there’s plenty to explore.
Travel enthusiasts can also discover unique experiences through vivid storytelling. It’s as if each article transports you to another world.
This eclectic mix ensures there’s never a dull moment on the site. Readers are sure to find topics that resonate deeply with their own lives and values.
Reader Interaction and Community Building
At mcdfoofforthoughts.com, reader interaction is at the heart of what makes this blog special. The writer actively encourages comments and discussions on each post. This creates a vibrant atmosphere where ideas flourish.
Community building goes beyond just writing. It invites readers to share their thoughts and experiences. Every comment isn’t just feedback; it’s an opportunity for meaningful conversations between diverse individuals.
The blog also features polls and questions that engage readers more deeply. You’re not simply a spectator here; you become part of something bigger.
This sense of belonging fosters loyalty among fans, making it feel less like a one-way street and more like a community gathering space. Whether you’re sharing insights or asking questions, your voice matters in shaping the conversation on mcdfoofforthoughts.com.
Personalized Recommendations and Book Reviews
At mcdfoofforthoughts.com, personalized recommendations are a highlight. The blog understands that reading preferences vary widely and caters to diverse tastes.
Each book review offers more than just a summary. It dives into themes, character development, and writing style. This depth helps readers connect with the material on a personal level.
The writer encourages interaction by inviting readers to share their thoughts on recommended books. This builds a sense of community where everyone’s opinion matters.
What sets these reviews apart is the genuine passion behind them. You’re not just getting information; you’re receiving insights crafted from real experiences with the text.
Whether you’re looking for hidden gems or popular titles, mcdfoofforthoughts.com has something tailored just for you. Each recommendation feels like it was handpicked based on your unique reading journey.
Conclusion: Why mcdfoofforthoughts.com Should Be Your Next Go-To Blog
mcdfoofforthoughts.com offers a refreshing escape into the world of thoughtful insights and engaging discussions. The unique perspective of its writer invites readers to explore ideas that might challenge their thinking or inspire new viewpoints. Each post is crafted to provoke thought, ensuring you leave with something valuable.
The variety of topics covered keeps content fresh and exciting. Whether you’re interested in literature, culture, or personal development, there’s likely something that resonates with you. Additionally, the interactive nature of the blog fosters community among readers. Engaging with fellow visitors can lead to meaningful conversations and shared experiences.
Personalized recommendations and book reviews are another standout feature. They not only guide your reading choices but also enrich your understanding of various subjects through carefully curated selections.
Adding mcdfoofforthoughts.com to your reading list means embracing an enriching journey full of exploration and connection. It’s a space where curiosity thrives, making it an essential stop for anyone looking to expand their horizons while enjoying quality content tailored just for them.
Introduction to Siberia Vladivostok
Nestled along the coast of the Sea of Japan, Vladivostok is a vibrant port city steeped in history and culture. This gem in Siberia offers not only stunning landscapes but also a culinary scene that reflects its rich heritage. From hearty traditional dishes to modern interpretations, the food here tells stories of resilience, diversity, and flavor. If you think Siberian cuisine is all about cold winters and simple ingredients, prepare to be pleasantly surprised! Join us as we embark on a gastronomic journey through the unique tastes and textures that define Siberia Vladivostok’s culinary landscape.
Characteristics of Siberian Cuisine
Siberian cuisine is a vibrant tapestry woven from diverse cultural influences. This region’s harsh climate shapes its culinary practices, emphasizing hearty and nourishing dishes.
Traditionally, Siberians rely on ingredients that can withstand the cold. Root vegetables, grains, and preserved meats are staples in many households. Seasonal foraging adds an exciting twist to their meals; wild mushrooms and berries often feature prominently.
The use of fermentation is another hallmark of this cuisine. From pickled vegetables to sour cream, these elements add unique flavors while also preserving food through long winters.
Cooking methods vary widely but frequently include boiling, steaming, and smoking. Such techniques enhance the natural flavors of locally sourced ingredients.
A strong community aspect surrounds meal preparation as families come together for communal feasting. This social element enriches the dining experience in ways that go beyond taste alone.
Traditional Dishes of Vladivostok: Borsch, Pelmeni, Stroganina
Siberia Vladivostok is a culinary treasure trove, showcasing rich flavors and hearty dishes. Borsch stands out as a vibrant beetroot soup, often enriched with tender meat and served with a dollop of sour cream. Its deep red hue embodies warmth and comfort, making it a staple during cold days.
Pelmeni are another beloved dish. These delightful dumplings are typically stuffed with minced meat, wrapped in thin dough, and boiled to perfection. Served with butter or vinegar, they offer an irresistible bite that speaks to Siberian hospitality.
Then there’s stroganina—a unique delicacy featuring raw fish or game sliced paper-thin. Often enjoyed frozen, it’s paired with dipping sauces for an adventurous experience that emphasizes the freshness and quality of local ingredients. Each dish tells a story rooted in tradition while celebrating the region’s rich natural bounty.
Unique Ingredients and Cooking Methods in Siberian Cuisine
Siberian cuisine thrives on its unique ingredients, shaped by the region’s harsh climate and rich natural resources. Freshwater fish from the Amur River, such as salmon and sturgeon, are staples in many dishes. They add a distinctive taste that speaks to the heart of Siberia vladivostok.
Wild mushrooms also play a significant role. Foraged varieties like chanterelles or porcini enhance flavors in soups and sauces. These earthy elements connect diners with the land.
Cooking methods often reflect practicality. Smoking, drying, and fermenting preserve food for colder months—traditional techniques passed down through generations.
Stews simmered over an open flame capture warmth during long winters while imparting deep flavors to meat and vegetables alike.
These practices create a culinary experience that’s not just about sustenance but also about honoring nature’s bounty in every bite.
Fusion Food and Modern Twists on Traditional Dishes
Vladivostok’s culinary scene is buzzing with creativity. Chefs are reimagining traditional Siberian dishes by blending local flavors with global influences. This fusion offers a fresh perspective on age-old recipes.
Take pelmeni, for instance. Some restaurants now fill these dumplings with ingredients like truffle oil or spicy kimchi, creating unexpected flavor combinations that delight the palate.
Borsch has also seen its fair share of innovation. In various eateries, you might find versions infused with coconut milk or garnished with avocado slices, enhancing the dish’s richness and providing a modern twist.
Siberia’s seafood is another canvas for creative expression. Dishes that once celebrated simplicity now showcase elaborate presentations and bold pairings—think salmon sashimi topped with pickled vegetables from traditional gardens.
This blend of old and new captures the spirit of Vladivostok while inviting adventurous food lovers to explore uncharted territories in taste.
Top Restaurants to Try in Vladivostok for Authentic Siberian Food
Vladivostok brims with culinary gems that showcase authentic Siberian food. For an unforgettable dining experience, start at “Koryo,” known for its rich flavors and warm atmosphere. Their borscht is a must-try, bursting with fresh ingredients.
Next up is “Pelmeni House,” where handmade dumplings steal the show. Each bite reveals a delightful mix of fillings—perfectly seasoned and served piping hot.
For those seeking something unique, check out “Stroganina & More.” This restaurant specializes in stroganina, serving raw fish cut into thin slices that melt in your mouth. The ambiance is cozy yet chic.
Don’t miss “Siberian Baikal,” renowned for its fusion takes on traditional dishes while keeping authenticity intact. Locals love their smoked salmon pelmeni paired with homemade sour cream.
Each venue offers a taste of Siberia Vladivostok’s rich culinary heritage waiting to be explored.
Bringing the Flavors of Vladivostok into Your Own Kitchen
Bringing the flavors of Vladivostok into your kitchen is an adventure waiting to unfold. Start by sourcing ingredients that capture the essence of Siberian cuisine. Look for fresh fish, game meats, and regional vegetables like beets and cabbage.
Try making borsch with beets and a touch of dill. The vibrant color alone is enough to brighten any meal. For a cozy night in, whip up some pelmeni filled with seasoned meat—these dumplings are hearty and satisfying.
Stroganina offers another unique experience; thinly sliced frozen fish served raw can elevate your culinary repertoire. Pair it with soy sauce or lemon zest for an exciting twist.
Experimenting with these dishes allows you to explore Siberian culture right at home while impressing family and friends with authentic tastes from this beautiful region!
Conclusion
Siberia Vladivostok is a hidden gem for food enthusiasts. The region’s culinary landscape reflects its diverse culture and rich history. Traditional dishes like borsch, pelmeni, and stroganina showcase the unique flavors that define Siberian cuisine.
The use of local ingredients adds depth to each meal, while modern interpretations keep things fresh and exciting. This fusion creates an evolving dining scene that appeals to both locals and tourists alike.
For those looking to experience authentic Siberian food in Vladivostok, there are several top-notch restaurants offering delightful menus filled with traditional fare. Each bite tells a story steeped in tradition yet open to innovation.
If you’re inspired by these culinary adventures, you can bring the essence of Vladivostok into your own kitchen with simple recipes using locally sourced ingredients or gourmet substitutes available at specialty stores.
Exploring the tastes of Siberia Vladivostok is not just about eating; it’s about experiencing a culture through its rich flavors. Whether you’re visiting or cooking at home, there’s always something new waiting to be discovered in this charming corner of Russia.
Introduction to Kompama Cuisine
Have you ever tasted a dish that felt like a warm hug? If not, it’s time to explore the vibrant world of Kompama cuisine. This culinary treasure is more than just food; it’s an experience steeped in rich flavors and traditions. Originating from diverse cultural influences, Kompama offers a unique blend of ingredients and techniques that tantalize the palate.
As we embark on this flavorful journey together, prepare your taste buds for an adventure through history, popular dishes, and the health benefits hidden within each sumptuous bite. Whether you’re a seasoned foodie or simply curious about new tastes, Kompama cuisine promises something special. Let’s dive into what makes this culinary gem truly unforgettable!
History and Influences of Kompama Cuisine
Kompama cuisine is a vibrant tapestry woven from diverse cultural influences. Its roots stretch back centuries, shaped by trade routes and migrations. This culinary art form embodies the stories of those who settled in the Kompama region.
Indigenous ingredients mingled with spices brought by traders. Over time, flavors evolved as communities adapted recipes to their local resources. Traditional cooking methods were passed down through generations, preserving unique techniques.
Colonial influences further enriched the cuisine, introducing new elements that blended seamlessly with local practices. The result is a dynamic fusion of tastes and textures that reflect both history and modern innovation.
Each dish tells a story of resilience and creativity, inviting food lovers to explore its rich heritage today. As you savor Kompama dishes, you’re not just tasting food; you’re experiencing a culture steeped in tradition and evolution.
Popular Ingredients in Kompama Dishes
Kompama cuisine is a vibrant tapestry woven from local ingredients. Fresh herbs play a starring role, with cilantro and mint adding bursts of flavor to many dishes.
Rice serves as the staple base, often paired with an array of vegetables that reflect seasonal harvests. Root vegetables like sweet potatoes bring natural sweetness, enhancing both taste and texture.
Seafood also shines in Kompama meals. Caught daily from nearby waters, fish and shellfish provide a rich umami profile that’s hard to resist.
Don’t overlook spices; they are essential for creating depth in flavors. Chili peppers lend heat, while turmeric adds warmth and color.
Fermented products contribute tanginess and complexity. From pickled veggies to fermented sauces, these elements elevate every bite into something memorable. Each ingredient tells its own story within the broader narrative of Kompama culture.
Must-Try Kompama Dishes and Where to Find Them
When diving into Kompama cuisine, a few dishes stand out as must-tries. Start with the iconic Kompama stew, rich in flavors and herbs. This dish showcases the heart of local cooking.
Next on your list should be grilled fish marinated in traditional spices. The perfect balance of tanginess and smokiness makes it unforgettable. Pair it with fresh greens for an authentic experience.
Don’t miss out on the savory rice cakes served during festivals. They are deliciously sweet yet satisfyingly chewy.
For those seeking these culinary delights, local markets are treasure troves. Check out street vendors who serve up steaming portions right off their carts.
Restaurants specializing in regional dishes often have extensive menus featuring classic items from this vibrant cuisine. Each bite tells a story that reflects the community’s heritage and love for food.
Traditional Cooking Methods and Techniques
Kompama cuisine is deeply rooted in tradition, employing methods that have been passed down through generations. One notable technique is slow cooking, which enhances flavors and tenderness. This method allows spices to meld beautifully with ingredients.
Another hallmark of Kompama cooking is the use of clay pots. These pots retain heat effectively and contribute a unique taste to dishes. Whether simmering stews or baking breads, clay cooking adds depth.
Grilling over open flames also plays a significant role. It imparts a smoky flavor that elevates meats and vegetables alike. Many families gather around these fires for communal meals, reinforcing bonds as they share delicious food.
Fermentation is another fascinating aspect of Kompama techniques. It transforms simple ingredients into flavorful staples like pickles or sauces, enriching the overall culinary experience while preserving nutrients efficiently. Each method reflects the culture’s rich history and love for food craftsmanship.
Health Benefits of Kompama Cuisine
Kompama cuisine is not just delightful; it offers numerous health benefits too. Its emphasis on fresh and locally sourced ingredients ensures that every dish is packed with nutrients.
Many Kompama dishes feature vegetables, whole grains, and lean proteins. These components work together to provide essential vitamins and minerals needed for overall well-being. The natural flavors in these meals often come from herbs and spices, which can enhance digestion and reduce inflammation.
Moreover, the traditional cooking methods used in Kompama cuisine retain the integrity of these ingredients. This means fewer preservatives and additives are involved, making meals healthier.
Eating a diverse range of foods within this culinary style promotes balance. It encourages mindful eating practices that foster a deeper connection to food sources while supporting sustainable farming initiatives in local communities.
The Future of Kompama Cuisine
The future of Kompama cuisine is bright and full of potential. As more people seek authentic culinary experiences, this vibrant food culture is gaining attention worldwide.
Chefs are experimenting with modern techniques while honoring traditional flavors. This fusion could introduce innovative dishes that appeal to diverse palates.
Sustainability plays a crucial role in the evolution of Kompama cuisine. As awareness grows around local sourcing, many chefs are prioritizing ingredients from nearby farms and markets. This not only enhances freshness but also supports local communities.
Moreover, social media platforms continue to amplify the reach of Kompama dishes. Foodies share their experiences online, creating buzz and drawing curiosity from new audiences.
As culinary tourism rises, destinations known for Kompama fare may see increased visitors seeking these rich flavors firsthand. The possibilities are endless as this remarkable cuisine makes its mark on the global stage.
Conclusion
Kompama cuisine offers a vibrant tapestry of flavors and traditions that beckon food lovers from around the globe. With its rich history shaped by diverse influences, this culinary art form reflects the heart and soul of the local community. By embracing key ingredients like fresh herbs, spices, and locally-sourced produce, each dish tells a story steeped in culture.
Exploring must-try dishes such as Kompama stew or grilled fish provides an authentic taste experience you won’t forget. As you navigate through bustling markets or cozy eateries, you’ll discover how traditional cooking methods add depth to every bite.
Beyond indulgence, Kompama cuisine also boasts numerous health benefits thanks to its emphasis on whole foods and balanced nutrition. This makes it not just delicious but nourishing for both body and spirit.
Looking ahead, there’s an exciting future for Kompama cuisine as chefs innovate while honoring age-old recipes. The global food scene is increasingly celebrating unique local flavors like these.
Enjoy every moment spent discovering the mouthwatering world of Kompama! Each meal is more than just nourishment; it’s an invitation into a culture brimming with warmth and hospitality. So whether you’re trying your hand at cooking or visiting local restaurants, let the flavors guide you on this delectable journey.
-

 TECHNOLOGY1 year ago
Top 10 Must-Read Stories from Kristen Archives You Can’t Miss
-

 TECHNOLOGY2 years ago
Sky Bri Net Worth Revealed: How She Built Her Financial Empire
-

 TOPIC2 years ago
Basement Renovation Contractors: How They Tackle Structural Issues During Renovations
-

 BEAUTY2 years ago
Revitalize Your Hair with Oribe Hair Care for Damaged Hair: Style It with Blue Dresses for Weddings and Events
-

 TOPIC1 year ago
5 Reasons the //Vital-Mag.Net Blog Dominates Lifestyle
-
TOPIC1 year ago
Should You Move from Thousand Oaks CA to Los Angeles?
-

 TOPIC1 year ago
Things To Know Before Moving To Burlingame, CA
-

 TOPIC1 year ago
Reasons You Should Move to San Francisco